

Treatise on the Essence of the Backup Mechanism in Proxmox VE
In the article "The Magic of Virtualization: an Introductory Course in Proxmox VE", we successfully installed a hypervisor on the server, connected storage to it, took care of basic security, and even created our first virtual machine. Now let's look at how to implement the basic tasks you need to perform in order to always be able to restore services in case of a failure.
Proxmox's built-in tools allow you not only to perform data backups, but also to create sets of pre-configured operating system images for fast deployment. This not only helps you create a new server for any service in a few seconds if needed, but also minimizes downtime.
We won't talk about the need to create backups, since that's obvious and has long been an axiom. Let's focus on some non-obvious things and features.
First, let's look at how data is stored during the backup procedure.
Backup algorithms
Let's start with the fact that Proxmox has decent built-in tools for creating backups of virtual machines. It allows you to easily save all the data of a virtual machine and supports two compression mechanisms, as well as three methods of creating these copies.
First let's look at the compression mechanisms:
1. LZO compression. A lossless data compression algorithm invented back in the mid-90s. The code was written by Markus Oberhumer (implemented in Proxmox via the lzop utility). The main feature of this algorithm is very fast decompression. So any backup created with this algorithm can be deployed in minimal time if needed.
2. GZIP compression. When using this algorithm, the backup is compressed "on the fly" by the GNU Zip utility, which uses the powerful Deflate algorithm created by Phil Katz. The main emphasis is on maximum data compression, which reduces the disk space taken up by backups. The main difference from LZO is that the compression/decompression procedures take quite a lot of time.
Archiving modes
Proxmox offers the system administrator a choice of three backup methods. With them, you can solve the task at hand by determining the priority between the need for downtime and the reliability of the backup made:
1. Snapshot mode. This mode can be called a Live backup, since using it does not require stopping the virtual machine. Using this mechanism does not interrupt the VM's operation, but has two very serious drawbacks - problems can arise due to file locking by the operating system, and it has the lowest creation speed. Backups created with this method should always be checked in a test environment. Otherwise, there is a risk that they may fail when an emergency restore is needed.
2. Suspend mode. The virtual machine temporarily freezes its state until the backup process is complete. The contents of RAM are not erased, which allows work to continue exactly from the point where it was paused. Of course, this causes server idle time while the information is being copied, but there is no need to shut down/power on the virtual machine, which is quite critical for some services. Especially if the startup of some services is not automatic. However, such backups should also be deployed in a test environment for verification.
3. Stop mode. The most reliable backup method, but it requires a full shutdown of the virtual machine. A regular shutdown command is sent, after it stops the backup is performed, and then a power-on command is issued to the virtual machine. The number of errors with this approach is minimal and most often reduces to zero. Backups created this way almost always deploy correctly.
Performing the backup procedure
To create a backup:
1. Go to the desired virtual machine.
2. Select the Backup.
3. Click the Backup now button. A window will open where you can select the parameters of the future backup.Backup parameters
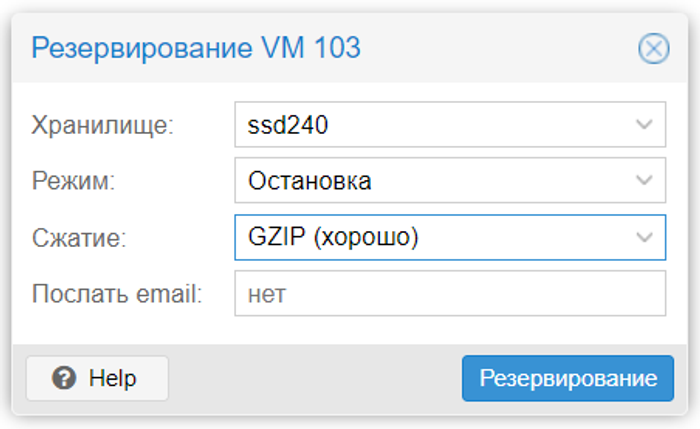
4. As the storage, specify the one we connected in the previous part.
5. After selecting the parameters, click the Backup button and wait until the backup is created. This will be indicated by the message TASK OK.
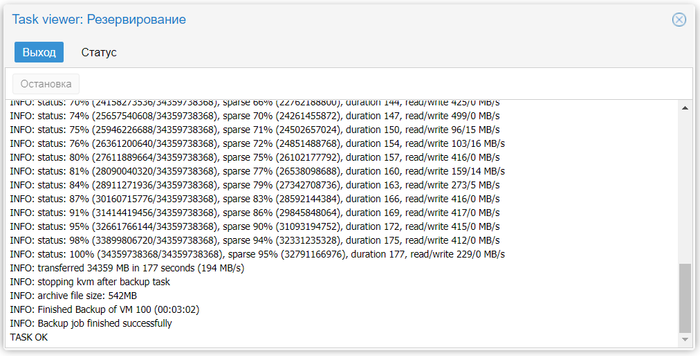
Now the created archives with backups of virtual machines will be available for download from the server. The simplest and most trivial way to copy them is SFTP. To do this, use the popular cross-platform FTP client FileZilla, which can work over the SFTP protocol.
1. In the Host field, enter the IP address of our virtualization server, in the Username field enter root, in the Password field - the one chosen during installation, and in the Port field specify "22" (or any other port set for SSH connections).
2. Click the Quickconnect button, and if all the data was entered correctly, you will see all the files located on the server in the active panel.
3. Go to the directory /mnt/storage. All backups created will be located in the subdirectory "dump". They will look like:
vzdump-qemu-machine_number-date-time.vma.gz if the GZIP compression method is chosen;
vzdump-qemu-machine_number-date-time.vma.lzo for using the LZO method.
It is recommended to download backups from the server right away and store them in a reliable location, for example in our cloud storage. If you unpack the file with vma, the utility of the same name that comes with Proxmox, the following files will be inside with the extensions raw, conf and fw. These files contain the following:
raw - disk image;
conf - VM configuration;
fw — firewall settings.
Restoring from a backup
Let's consider a situation where a virtual machine was accidentally deleted and needs an emergency restore from a backup:
1. Open the storage where the backup is located.
2. Go to the Content.
3. Select the required backup and click the Restore.
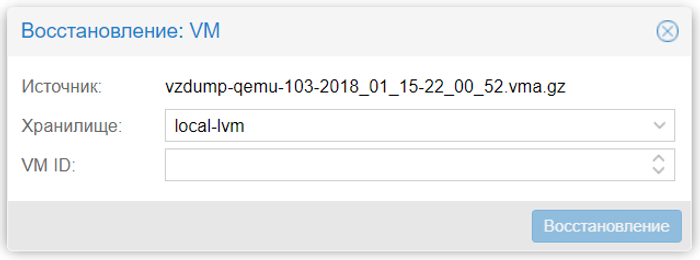
Restore
4. Specify the target storage and the ID that will be assigned to the machine after the process is complete.
5. Click the Restore button.
As soon as the restore is complete, the VM will appear in the list of available ones.
Cloning a virtual machine
For example, suppose a company needs to make changes to some critical service. Such a change is implemented by making a number of edits to configuration files. The result is unpredictable, and any mistake can cause a service failure. To keep such an experiment from affecting the running server, it's recommended to clone the virtual machine.
The cloning mechanism creates an exact copy of the virtual server, on which you can make any changes without affecting the operation of the main service. Then, if the changes are applied successfully, the new VM is put into operation and the old one is shut down. There is a feature in this process that should always be kept in mind. On the cloned machine, the IP address will be the same as on the source VM, meaning an address conflict will occur when it starts.
Let's explain how to avoid this situation. Right before performing the cloning, you should make changes to the network configuration. To do this, you need to temporarily change the IP address, but not restart the network service. After cloning is complete, the settings on the main machine should be reverted, and any other IP address should be set on the cloned machine. This way we get two copies of the same server on different addresses. This allows you to quickly bring a new service into operation.
If this service is a web server, it's enough to just change the A record at your DNS provider, after which client requests for this domain will be sent to the address of the cloned virtual machine.
By the way, Selectel provides all its clients with the service of hosting any number of domains on NS servers for free. Records are managed both through our control panel and through a special API. Read more about this in our knowledge base.
Cloning a VM in Proxmox is a very simple task. To do this, you need to perform the following steps:
1. Go to the desired machine.
2. Select from the menu More item Clone.
3. Fill in the Name parameter in the window.
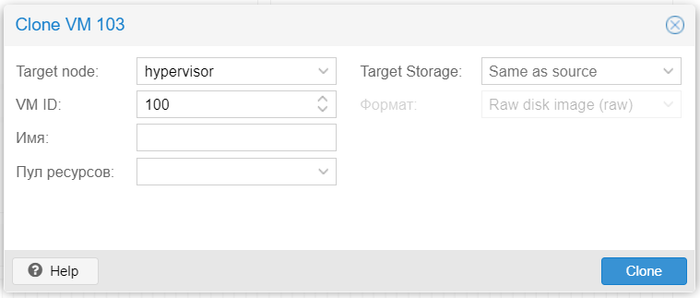
4. Perform the cloning by clicking the Clone.
This tool allows you to make a copy of a virtual machine not only on the local server. If several virtualization servers are combined into a cluster, this tool lets you immediately move the created copy to the desired physical server. A useful function is choosing the disk storage (the Target Storage) parameter), which is very convenient when moving a virtual machine from one physical medium to another.
Virtual disk formats
Let's talk in more detail about the storage formats used in Proxmox:
1. RAW. The clearest and simplest format. This is a file with hard disk data "byte for byte" without compression or optimization. This is a very convenient format, since it's easy to mount with the standard mount command on any Linux system. Moreover, it's the fastest "type" of storage, since the hypervisor doesn't need to process it in any way.
A serious drawback of this format is that however much space you allocated for the virtual machine, exactly that much space on the hard disk will be taken up by the file in RAW format (regardless of the actually used space inside the virtual machine).
2. QEMU image format (qcow2). Probably the most universal format for performing any tasks. Its advantage is that the data file will contain only the actually used space inside the virtual machine. For example, if 40 GB of space was allocated, but only 2 GB was actually used, all the rest of the space will be available for other VMs. This is very relevant when it comes to saving disk space.
A small downside of working with this format is the following: to mount such an image on any other system, you first need to load a special nbd driver, and also use the qemu-nbd utility, which allows the operating system to access the file as a regular block device. After that, the image becomes available for mounting, partitioning, file system checking, and other operations.
It should be remembered that all input/output operations when using this format are handled programmatically, which slows down active work with the disk subsystem. If the task is to deploy a database on the server, it's better to choose the RAW format.
3. VMware image format (vmdk). This format is "native" to the VMware vSphere hypervisor and was included in Proxmox for compatibility. It allows you to migrate a VMware virtual machine to Proxmox infrastructure.
Using vmdk on a permanent basis is not recommended, as this format is the slowest in Proxmox, so it's only suitable for performing migration, nothing more. This drawback will likely be eliminated in the near future.
Working with disk images
Proxmox comes with a very convenient utility called qemu-img. One of its functions is converting virtual disk images. To use it, just open the hypervisor console and run a command in the format:
qemu-img convert -f vmdk test.vmdk -O qcow2 test.qcow2
In the example above, the vmdk image of the VMware virtual drive named test will be converted to the qcow2 format. This is a very useful command when you need to fix a mistake made when initially choosing a format.
With this command you can forcibly create the required image using the create argument:
qemu-img create -f raw test.raw 40G
Such a command will create a test image in RAW format with a size of 40 GB. Now it is suitable for attaching to any of the virtual machines.
Resizing a virtual disk
And finally, let's show how to increase the size of a disk image if for some reason it has run out of space. For this we'll use the resize argument:
qemu-img resize -f raw test.raw 80G
Now our image has become 80 GB in size. You can view detailed information about the image using the info argument:
qemu-img info test.raw
Don't forget that simply expanding the image will not automatically increase the size of the partition - it will just add available free space. To expand the partition, use the command:
resize2fs /dev/sda1
where /dev/sda1 is the required partition.
Automating backup creation
Using the manual way of creating backups is a very labor-intensive task that takes a lot of time. That's why Proxmox VE has a built-in tool for automatic scheduled backups. Let's look at how to do this:
1. Using the hypervisor's web interface, open the Datacenter.
2. Select the Backup.
3. Click the Add.
4. Set the parameters for the scheduler.
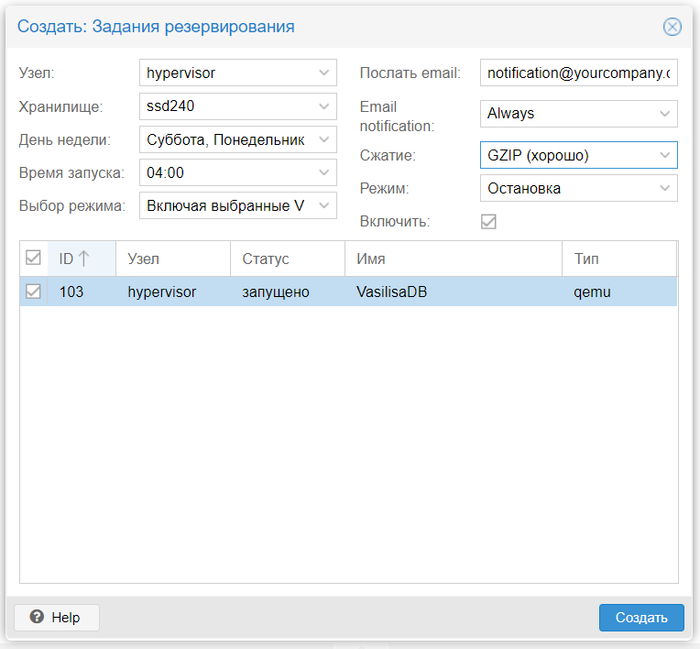
5. Check the box for the Enable.
6. Save the changes using the Create.
Now the scheduler will automatically run the backup program at the specified time, based on the given schedule.
Conclusion
We have looked at the built-in ways of backing up and restoring virtual machines. Using them lets you save all your data without much trouble and urgently restore it in case of an emergency.
Of course, this is not the only possible way to preserve important data. There are many tools, such as Duplicity, that can be used to create full and incremental copies of the contents of Linux-based virtual servers.
When performing backup procedures, you should always keep in mind that they place an active load on the disk subsystem. Because of this, it's recommended to perform these procedures during periods of minimal load, in order to avoid delays in input/output operations inside the machines. You can monitor the status of disk operation delays directly from the hypervisor's web interface (the IO delay parameter).
If you have any questions, we will be happy to answer them in our online chat or our messengers!.